In general, SQL Server 2008 data replication is
exceptionally easy to set up via SQL Server Management Studio wizards.
However, if you use the wizards, you need to be sure to generate SQL
scripts for every phase of replication configuration. In a production
environment, you are likely to rely heavily on scripts and not have the
luxury of having much time to set up and break down production
replication configurations via wizards. Generating SQL scripts also
eases the setup/breakdown process in development, test, and user
acceptance environments.
You always have to define any data replication configuration in the following order:
1. | Create or enable a distributor to enable publishing.
|
2. | Enable publishing. (A distributor must be designated for a publisher.)
|
3. | Create a publication and define articles within the publication.
|
4. | Define subscribers and subscribe to a publication.
|
Figure 1
shows SQL Server Management Studio Object Explorer with three separate
server connections. These three servers represent a possible replication
topology.
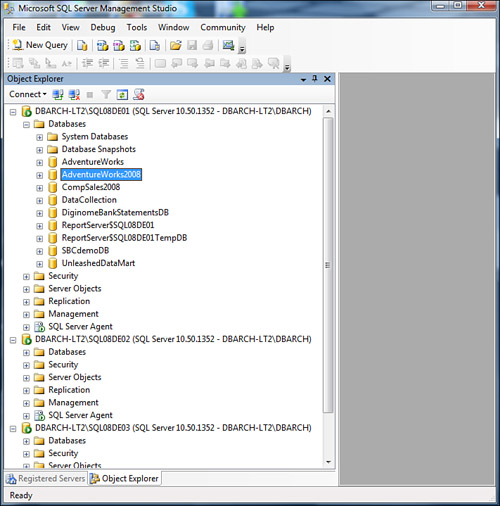
The following section takes
you through the process of building up a typical central
publisher/remote distribution data replication configuration. The
following SQL Server named instances are used for different purposes (as
shown in Figure 1):
Publisher— A SQL08DE01 named instance
Distributor— A SQL08DE02 named instance (REMOTE distributor)
Subscriber— A SQL08DE03 named instance
The following section
highlights the different areas in SQL Server Management Studio that are
needed to create this replication configuration.
Creating a Distributor and Enabling Publishing
Before setting up a
publisher, you have to designate a distribution server to be used by
that publisher. As discussed earlier, you can either configure the local
server as the distribution server or choose a remote server as the
distributor (not on the same machine as the publication
server). You can configure the server as a distributor and publisher at
the same time, or you can configure the server as a dedicated
distributor on the remote server separately. In the sample topology
described here, you start by creating a remote distributor separately so
you can orient yourself to what is happening on each server in the
topology as it is being built up. You are also able to enable a specific
SQL Server instance as the publisher that will use this distributor
(all in one wizard sequence). This method is very efficient.
Before you can configure replication, you must be a member of the sysadmin
server role, so you should ensure that now. Then you use the following
steps to configure a server as a distributor (remote distributor):
1. | In SQL Server Management Studio, locate the Replication node under the server that will be the distributor (under the SQL08DE02 named instance node). Right-click the Replication node and choose Configure Distribution. This starts you through the wizard, which provides three options:
Configure this server to be a distributor. Configure this server to be both a publisher and distributor. Configure this server to be a publisher that uses another server as its distributor.
|
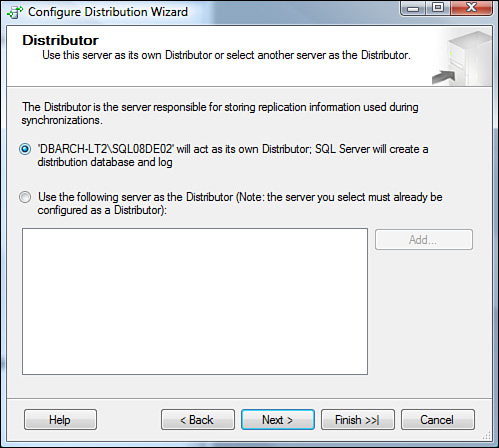
2. | When
the wizard starts, click past the initial Configure Distribution Wizard
splash page. Then choose the first radio button, which should say
‘DBARCH-LT2\SQL08DE02’ Will Act as Its Own Distributor (as shown in Figure 2).
This designates this server as a distributor for one or more
publishers. The distribution database and log are created here as well
(and not on the publication server).
|
3. | You
are then asked how you want the replication agents to be started.
Select the agents to be started automatically (the Yes option).
|
4. | Next
comes the location for the snapshot folder. Give it the proper network
full pathname. Remember that potentially a large amount of data will be
coming here, and it should be on a drive that can support the snapshot
concept without filling up the drive.
|
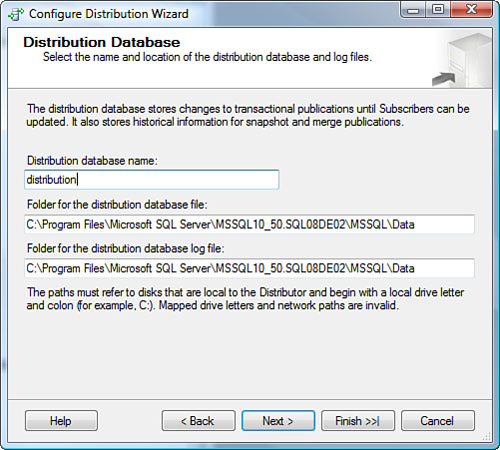
5. | When you are asked to configure the distribution database, select the default settings. Figure 3 shows all the distribution database name and location information.
|
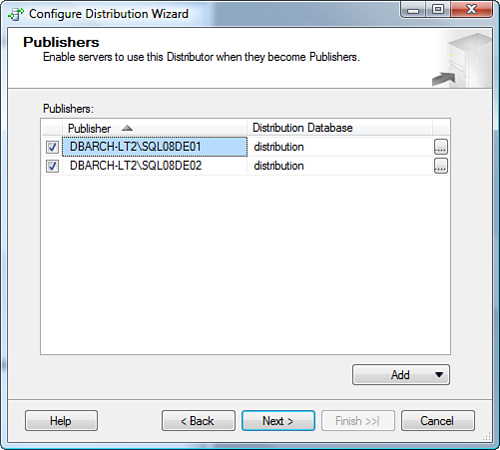
6. | Identify
the publisher if you know which SQL Server instance will be publishing
the data that this distributor will distribute for. To do this, click
the Add button at the bottom-left corner of the Publishers page to
enable servers to use this distributor when they become publishers. You
are prompted for the server name and authentication method for the
distributor to reach this publisher. Specify DBARCH-LT2\SQL08DE01 as a publisher that will use this distributor. The end result, as shown in Figure 4, is DBARCH-LT2\SQL08DE01
designated (checked) as a publisher that will use this distribution
database (distributor). Remember to uncheck the SQL Server named
instance of the distribution server if you don’t want to publish from
that server (the SQL08DE02 named instance).
|
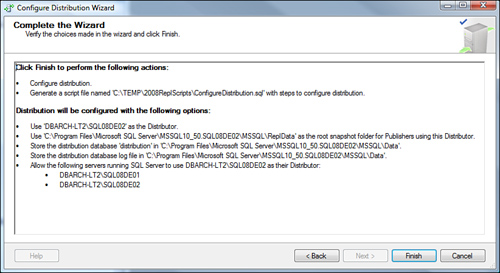
7. | Specify
a distributor password. This is the password that will be used by
publishers to connect to the distributor. You will be able to administer
this password through SQL Server Management Studio directly. The wizard
then summarizes what actions you want to take place, such as configure
the distribution server or generate a script file with steps to
configure distribution. Choose both. It’s always good to have the
scripts created now so you can start script-based configurations
immediately. A Complete the Wizard page is displayed, describing all the
tasks that are about to happen, along with their configuration
specifications. Figure 5 show this summary.
|
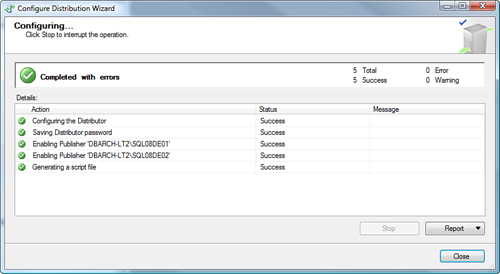
When you click Finish,
several things begin to occur. First, a configuring dialog page comes up
and spins its wheels through each step you have requested (as shown in Figure 6).
A summary of steps, errors, and warnings is displayed on this page.
When it completes, you can explore any issues (errors or warnings) by
drilling down in the Report option (lower-right side of this dialog). Make sure you see Success after each step of this configuration.
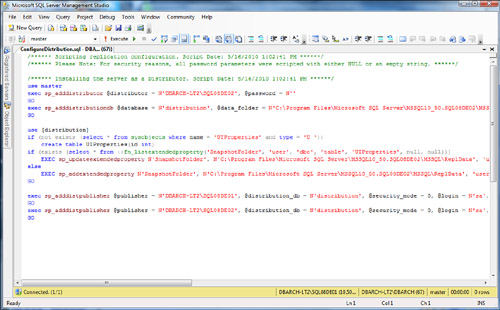
Now is probably a good time to
locate that distributor setup and enabling publication script and drop
it into your replication administrator folder that you keep in a safe
place. Figure 7
shows what this script looks like. Notice that the password is not
displayed.
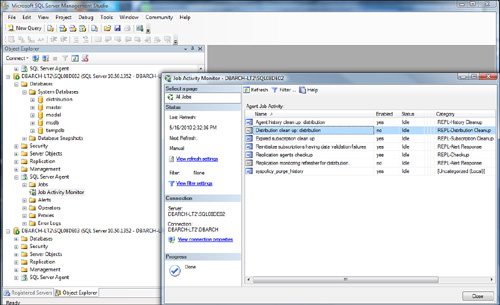
When the distributor is
configured and the distribution database is created, a series of
replication agents (managed by SQL Server Agent) are created, with
various duties. Figure 8
shows the initial set of agents created on the distribution server (as
seen from the Job Activity Monitor under the SQL Server Agent). No
agents exist yet that actually publish data or distribute data. Those
agents are created later, as you start publishing and subscribing.